Monday, 3 June 2013

Painting a boring storage unit.

Without doubt, every home has a functional piece of furniture which is inherently useful and inherently dull. My home is no exception.


This was a great unit from Ikea. It was originally a piece of office furniture, so was made to be functional, not beautiful. It was sturdy, heavy and in great condition. It was also a bit of an eyesore. From the grey plastic handles to the grey plastic feet, it had less personality than week-dead fish.

With a little bit of paint, some extra touches and new door handles, it was transformed into a lovely piece of sitting room furniture which provides much needed storage in an otherwise unused alcove.


Once again, Poppy and I worked together and had lots of fun. We started by dismantling it (thank you Ikea, I love that your furniture can be deconstructed and reconstructed with such ease) and permanently removing the grey plastic feet and handles. The separate parts were taken downstairs to their new location and put back together in a slightly different format, with the smaller section in the middle to make it look more symmetrical and balanced. 

As the plastic feet had been removed, we needed to replace them to allow the unit to stand comfortably above floor height. We used simple blocks of wood, just rough-cut slices from a sturdy piece of timber and applied them to the underside of the base.

For the next step to hide our rough-sawn feet, we screwed a length of planed timber to the foot of the unit and embellished it very simply with a piece of quadrant along the base, like so:


The top received the same sort of treatment, but with an added bar across the top of the primary piece of timber, just as an extra detail.


The big grey plastic handles were originally inserted into each door, leaving a large hole on removal. With a huge amount of patience and various layers of filler, we could have filled the holes, but that sounded like a bit of a chore, so instead we picked up some cheap heart shaped signs and back screwed them over the missing bits :-)

The doors, handles and new timber were then painted up with cupboard paint (sorry, I don't remember the brand this time, but I do remember that it took bloody ages to choose and that the colour was ivory) and some cute ceramic handles affixed onto the new heart shaped back plates. I found the handles on ebay and was thrilled to bits to find that the colour matched the rest of the tones in the room.


We did change the construction inside the unit to allow it to be more friendly to my crafting needs (extra shelves, screws for hanging tools and frames for holding jewellery) but I didn't really want to show you what a darned mess it is inside ;-)


The total project cost came to about £50 and was well worth the investment to change a useful, but aesthetically dull piece of furniture into something rather more beautiful.


Sunday, 2 June 2013

Building a garden chair.

I'd forgotten to add this until I looked through my cousin Hannah's photographs on facebook. She's an absolute genius for taking a photo diary of this one as we went along. We were really excited about making these as we hadn't built anything together before. The sun was shining, the birds were chirping and we needed somewhere to sit in peace in the garden. And so, the garden chairs were born.


This chair has a twin, bit I think you get the idea. Hannah is my absolutely amazingly epic cousin from Australia. We share an interest in adventure and change, so while she was visiting England a couple of years ago, we decided to build some garden furniture on a whim. Decent garden chairs can cost a pretty penny, but can be built for a fraction of the cost when using treating decking boards and timber. 


Inexpensive tanalised timber can be purchased at most of the larger DIY stores in the garden section and will cost very little. Be sure to purchase the planed version if you plan to build furniture with it as the sawn version will be very rough and will leave an ugly finish. We started with the sides of the chair:


They're upside down in this picture, but consist of one long back leg, a shorter front leg, a bar for the arm and a bar to brace the seat. We added 45 degree angled braces for the sections connecting the arm bar and the back leg, as you can see. When building furniture, make sure that the surface you are working on is level and check that your angles are true after every step. It's easy to correct as you're going along, but very difficult to correct an entire construction.

Although the timber had been treated, we knew that we wanted a bold colour finish, so added our chosen paint at points which we expected to be difficult to paint on completion of the build.


Next, we constructed a simple seat with three cuts of a decking board and two side bars, leaving a gap at the rear of the bars to allow space for the backrest. This is as good a point as any to recommend that you use decent wood screws. Reisser make particularly good quality Phillips-head wood screws, but they're a bit of an investment. Buy the best quality you can afford and they will return the expenditure by being more efficient and easier to use. Buy in bulk if you can as screws always come in handy once you've been bitten by the building bug!


After adding the seat to the basic side frames we then screwed a bar along the top of the back legs and a longer slice of decking along the front to hide the underside of the chair and add support.


I'm afraid that we forgot to photograph the next step, but we included lengths of timber running down the inside of the back support set at about an eighty degree angle from the seat. This was to ensure that our backrest would be very slightly tilted when in situ. We made a frame which mimicked the seat for the backrest with three slices of decking and two support struts, then screwed it onto the bare bones of the chair.


At this point, it started to look very much like a chair indeed, but still needed arm rests as it just didn't look like a slouchy enough space for us as yet. We measured the arms and cut two lengths of decking to those measurements. For the sake of soft corners, we cut a small 45 degree angle from each corner of the front of the arms and about a 20 degree longer cut from the back, sanded the rough edges, then screwed them on.


For a pretty and waterproof finish, we finished the chairs with two coats of Sadolin My Garden Woodstain in a colour called Harry's Deckchair. A lovely project. The chairs are heavy and sturdy and are weathering well. They're nearly two years old now and require a good scrub and repaint, more to keep them waterproof than for any other reason as the colour hasn't faded.

I think that each chair cost about twenty pounds when hardware and decoration costs were added. Definitely worth it though as they're also too heavy to steal ;-)

Hannah was a trooper and we have another project lined up for when she returns to visit me in a few weeks. Happy days :-)


Saturday, 1 June 2013

The electricity cupboard

This is my electricity cupboard:


This was my electricity cupboard: 


Pretty gruesome, I'm sure you'll agree. The external section to keep it protected was a metal cabinet which had kindly been stuck to the wall at the wrong angle on both planes! Not only did it rest slightly diagonally when viewed from the front, but also from the side. Joy. 40 years of bad paint jobs, a broken catch and rusted hinges added the finishing touches to that "I live in a squat" impression. 

There was nothing else for it - it had to go. My landlord felt no need to protect me from such a hideous monstrosity in my hallway (oh yeah, it had to be in the first room that people see, to completely mortify me when friends came to visit) so it was up to Poppy and I to address the situation.

And so, Fred was born.


Isn't Fred beautiful? It may seem a little strange to name a cupboard, but Poppy and I have worked on so many elements of the house that projects need specific names when we discuss them or we get mixed up. 

We boxed in the cupboard from floor to ceiling with a very basic frame, allowing for support bars at either side to fix in shelves after construction. Sorry I don't have full project pictures, but I didn't know back then that I would be describing the process in the future.

Once the frame was fixed to the walls and ceiling, we added tongue and groove shelves (they only needed to be lightweight) and tongue and groove panels on the sides. The doors are also T&G with black iron hinges and brass catches.


All in all, this was a relatively low cost project when you consider that it not only provided storage, but also beautified an undeniably ugly space. I was happy to leave the black heads of small brads showing where the T&G was held onto the box and finished up with two coats of antique pine matt varnish to help the new wood blend into the hallway. All in all, another fun job. Few people remark on Fred, which is a bit of a shame as it was a doozy of a project, but I think that's because it blends well with the surroundings and seems to look as though it's been there forever.

Tuesday, 28 May 2013

Renovating a stained/varnished table.


This was and still is one of my favourite projects. One - because it's gorgeous, two - because it's in constant use and three - because it was one of the few times I actually spent what I would consider to be a lot of money on a piece. 

When I say a lot of money, maybe not so much by other people's standards. It's an eight seater dining table, but I only purchased four chairs as there are just the three of us. The table itself cost £75 and the chairs were thrown in for an extra thirty by a local second hand dealer called Steptoe's. If you're in the Exeter area and you live for junk, pop down and pay them a visit on Marsh Barton Industrial Estate. They specialise in house clearance and reclamation from the local tip, so you find a delightfully eclectic hodgepodge of absolute treasure. From stained glass panels to antique commodes, Steptoe's has it all. I keep popping in and pining after a particular Art Deco mantelpiece, but alas, I have no fire with which to adorn one and I can't think of a good enough reason to have one anywhere else. If you can think of a good enough reason, please feel free to leave a comment and tell me how I can get away with it ;-)

Already I had £105 invested in this particular venture and the costs would just increase when paint, varnish, handles and sandpaper were thrown in, but I figured that this one was worth it since it would be such a prominent (and hopefully permanent) feature in the kitchen. 


That's me cutting sandpaper at the table, ready for Poppy to jump in with the big guns :-) The lighter section of table top has already been sanded back in this picture and looks far better for it. 

The table itself was a bit of a wreck. As you can see, dark brown matt stain was complemented nicely by rather large scratches down each one of the legs. It looked as though the table's last home had been inhabited by a cat without a scratch post, so it just sharpened its claws on any available and likely looking surface.


As you can guess, the sanding had to be pretty heavy handed to take out the deep welts left in the surface of the legs and tabletop by the somewhat over zealous feline, but I wasn't after a perfectly smooth finish, so it just needed to be level enough not to offer splinters to any unsuspecting limb. Personally, my tastes lean towards a slightly rustic look. I like scarred wood with dints and divots. I think it all adds character and makes the furniture look more real somehow. My favourite has to be old woodworm trails. Mmmm, they're loooovely :-) 


This set was never designed to be flawless, but rather more shabby, with the intention of allowing a soft paint finish to age and deteriorate over a short period of time and yield into a distressed look through hard use. Poppy spent a good hour with the sander in hand and I had to stop her from obsessing about taking out all of the imperfections - she seems to think that they reflect badly on her work. They don't, I like them! 


Here we have some residual cat scratches in the surface of the table which really bothered Poppy, but I liked them, so they stayed! 

With the surfaces clean, clear and ready for a finish, we pulled out a trusty can of Ronseal Diamond Hard Matt Varnish for the top of the table. I really rate this product. I've managed to clean permanent pen off the surface without causing harm to the finish - boo yah! This stuff goes on easily, dries quickly and washes out of your tools with warm water. That's my kind of product. It doesn't offer a truly matt finish, but it's certainly not a glossy one.


For the legs, I used a white oil based undercoat, just an own brand one from Wickes. Oil base was chosen because it would not allow the acrylic top coats to adhere too efficiently, so they would slowly wear away over time revealing a white finish and wood underneath. Two coats of the undercoat with a decent dry time in between, followed by two coats of Craig and Rose 1829 acrylic in Morris Blue. 


The two small drawers either side of the tabletop were finished with new cut glass handles from B&Q. They never really see the light of day as they sit beneath my eyeline, but I know that they're there and I think they're a nice touch. I also lined the drawers with some pretty paper from the local florist, but that was just me being fanciful.


This table has been in use for over a year now, is distressing nicely along the legs, but maintains a good sound surface on the top. I have yet to find a substance which can't be removed from the Diamond Hard. I've even left accidental splodges of gloss on there when working on other projects, but if you give it some beans, all stains will come off.

I love this table. It makes me smile. It's usually covered in clutter and tools and nonsense, but when it's clear it's a beautiful addition to the room.


Monday, 27 May 2013

Painting waxed furniture.

This unit had seen better days to be honest. I had to fix a drawer bottom which kept dropping out, the screws were all a little loose and there were bits and bobs missing all over. Still, fearless Girl Friday attacked the project with gusto, determined to give it a makeover (also, there was no way in the world I was going to spend hard earned cash on a new one) and a new lease of life.


Not bad, but not great. This chest of drawers had been stored in a damp flat for a couple of years and had some unsightly greyish green dusty mould marks. Urgh. Not exactly inspiring. I was especially careful to use a mask when sanding this one as I was not enamoured with the thought of mould spores taking up residence in my lungs. It had a very slight wax finish, so needed to be sanded back to bare wood to make sure that the new paint would adhere properly. This I did after removing the handles, if not with relish, then with a sigh of inevitability. 

You will find jobs along the DIY path which you will enjoy and jobs which you will endure. For me, machine sanding is dull and noisy, I tend to leave it to Poppy when I can. After sanding, I coated the whole piece carefully with two coats of my trusty Ronseal Knot Block, Primer and Undercoat. Again, great product. Then for the fun bit! Choosing lovely colours to bring out the best in it. Two coats, as always.


Muy bella! With colours from the Craig and Rose 1829 acrylic line in Eau-De-Nil (meaning Nile Water, revoltingly enough. I have never felt the need to paint anything in the colour of a muddy river), Regency White and Tapestry Green. I'm a big fan of pastels. They're easy to change, easy to accessorise and all go together well. I used the original handles again as they seemed quite suited to the new personality of the chest.

All in all, another simple change which required little financial input, just a smidgen of elbow grease and a pinch of patience. Try it yourself. Be brave, give it a go and always save your old tins of paint. It's amazing how often an inch of paint in the bottom of a tin can come in handy for touch ups or small projects.

Painting bare wood.

A decent paint finish can change the whole character of a piece of furniture. Even the shabbiest and most threadbare of possessions can be lifted and renovated with a new finish. As long as your piece is sound, there will be a way to revamp it and turn it into something lovely. My advice on this subject is to be fearless. What do you love? Pink? Flowers? The Hulk? Stick whatever you love on some furniture you can't stand. It's a no-lose situation. If you hate it already and it turns out badly, you'll still hate it, but you'll have learnt a few tricks along the way. The best case scenario is, of course, that you produce something you love.

This little unit is a good example of what can be achieved when dealing with a bare wood finish which doesn't require stripping.


This little unit was looking a bit shabby, but was still useful and necessary. It had crayon on it (yeah, thanks for that Squeaker) and had that generally grimy look that unfinished pine can develop after a couple of years of use. I took out the drawers, removed the handles and gently cleaned as much of the grime and crayon as I could. When cleaning unfinished wood, use as little liquid as possible or you'll raise the grain and the wood won't be as smooth. Sandpaper is almost always your friend in this instance, so sand away any stubborn stains or marks.

To prep the wood I used Ronseal Knot Block, Wood Primer and Undercoat. It's a three in one product and although a little pricey, it's great stuff and will save you time and stress by taking three steps in two coats. It's also water based and dries quickly, so there's not as much waiting around as there is with oil based paints.


When my first two coats of ronseal had dried, I applied two coats of light blue acrylic (Craig and Rose 1829 in  Porcelain Blue) to the body of the unit and two coats of cream acrylic (again, Craig and Rose 1829 in Regency White) to the drawer fronts. Personally, I really like acrylic. It's pretty hard wearing, available in a wide variety of colours and is easy to apply. Your brushes will be washable in plain old water and fairy liquid and it can be cleaned from solid surfaces with ease if you catch it quickly. Acrylic also has the benefit of having a low VOC content, so it's one of the less harmful paints. Don't get me wrong, the sturdy finish of a good solvent based gloss is lovely, but they're hard to work with and hard on the lungs too.

I was going to replace the handles with something different and then decided that I rather liked the old ones now that they were based on a lovely clean finish. Definitely worth the effort and would make a simple first project.

Low cost wall decorations.

Once again, this post is all about my little girl's room. I would do loads more DIY and decoration for my little dude, but he seems less than thrilled when I offer him decorative flowers and butterflies. I don't know why.


These little flowers were inspired by some blooms which I saw on Pinterest. They immediately jazz up a plain wall and can be easily changed to suit the theme in any room, just use a different design of paper. They're very simple to make and cost next to nothing. They're even so easy that they could be used for temporary venue decoration if required. I think pearlized paper would look beautiful for a wedding.

So, here goes: step one, fold your piece of paper in half, then in half again.


Work out which corner is the centre of the paper and make sure that corner stays uncut.

Step two: on your folded paper, draw a simple single petal shape, then cut off the corners around your design.


Step three: open out your folded piece of paper and it should look like this: 


Roll the paper into a gentle curve between your first and second fingers in a sweeping motion, putting slightly more pressure on with the upper finger.


Repeat steps one to three in a contrasting paper, making sure that this piece is slightly smaller than the first. Put the smaller on top of the larger together with some glue, add a button as a beautiful centrepiece - et voila!


I stuck them to my daughter's wall to hide a couple of rather large bumps in the plaster which I'd neglected to sand when last decorating (blush, blush) and now I rather like them. 

The same concept can be applied to simple butterfly shapes (which I have also done and will upload at a later date) and can prove a cost effective change which requires little investment but your time. Crafting paper can be bought as a pack of similar designs and reused in various areas in a room if you like a specific colour or design theme.


Well, it's half term, so Squeaker and Dude are off school. This means a slowing of my usual work rate as we'll be off to the museum with Mr Friday and hopefully out in the sunshine too. I'll keep my camera to hand just in case I find any fabulous inspiration ;-)


The loft bed.

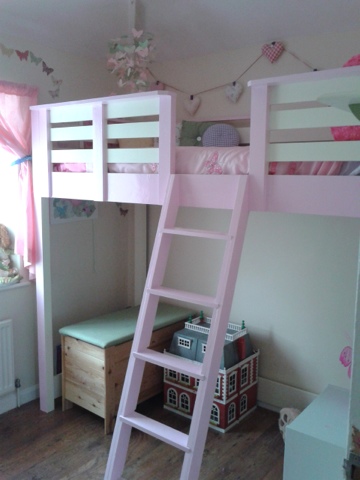
I made a loft bed. Well, we made a loft bed. My Poppy and I. I really can't take all the credit for that one. Maybe not even a full fifty percent of the credit actually. Poppy worked like a Trojan and I bring her in for all of my heavy work. I am only five foot one and one half inch tall. This leaves me at a slight disadvantage when it comes to big girl jobs, so Poppy runs to my rescue. 

My little girl has just turned six and was becoming far too big for her junior bed. She has one of those tiny little box bedrooms which is a real pain to furnish. Not enough room and too much child. Add to that the fact that purchasing a pre-made loft bed is an expensive business and you have a recipe for disaster. So we made this:


That's my squeaker, ready for bed.

This project was not our own design, but one which we adapted from Ana White. She's a genius - if you haven't seen her site, go and check it out this instant! There are lots of free plans available and they're all accessible and rated depending on your ability and price range. Fantastic.

We have placed the ladder in a different location to allow for the funny dimensions of Squeaker's room. She still has lots of space for storage underneath and absolutely loves being up high. I did have initial concerns over whether or not she'd be confident sleeping on high (with visions of her saying "Sorry mummy, it's just too high, now i'll have to sleep in your bed FOREVER" it was with trepidation that her new sleeping arrangements were revealed) but my fears were unfounded. Never before has she played quietly in her own room, but now she sneaks toys up the ladder with her and spends hours quietly amusing herself. Mummy did the dance of joy.

The total timber cost for the project was £140 and it is a staggeringly solid piece of kit. I can get up there quite comfortably to make her bed or read her stories. I enjoyed the build with Poppy, but the paint finish was an absolute chore. By that point Poppy had gone home and I had hours of exceptionally dull work to complete with only the Foo Fighters for company. Don't get me wrong, Dave Grohl's company is not to be sniffed at, but is no substitute for putting the world to rights with a pal.


Without paint, it was still pretty but I very definitely needed a hard wearing finish to put up with the hammering it was going to take from my excitable six-year-old and her equally excitable friends and so followed sixteen hours of painting...separated into four hour sessions with sixteen hours between each coat. In the end, I did the unthinkable and decided that the finish was 'good enough' and left out the last coat - for the sake of my own sanity. I'm still glad I did.


This is the almost finished product. I still plan to make some curtains for beneath the bed frame so that she can have a fort of her very own, but I keep forgetting to buy new fabric.

As she gets older, that Ana White designs allow for a desk and bookcase to be built in underneath, but I figured I'd give her some extra play room for now. Pictures will follow as I get around to making curtains and bunting and garlands of flowers :-)


Girl Friday's first post.


I am Girl Friday - that's me dressed as Dorothy for Halloween. I have two children which makes it hard to get 'normal' photos of me. In most photos I'm either dressed up in funny glasses to amuse the little ones or I look like hell because I'm so tired, so you got the Dorothy look :-) I am a single mother on a mission. A mission to have a beautiful home, a thriving business and happy children. 

I should probably start off by saying that I really don't understand technology, so this has been something of a struggle. I use it, but I don't understand it. I live in a very firmly physical world, about as far from a virtual world as I can possibly get. I have a Mr Friday and this morning he offered me advice on setting up a blog. The first site I tried without his input and it was an unqualified disaster. I rang him and told him of my stress and asked why didn't software work the way it was supposed to? His response "Oh, I never expect it to work first time."

Seriously?

Maybe that's why I love DIY so much. I can always make it work. It makes beautiful sense to me. There's always a way to modify your project to make it function. Sure, sometimes it means scrapping the entire activity and starting again, but I can always make it work ;-) I think perhaps I'm just less patient with technology.

Well, I'm all about making things. Sometimes it's a renovation project, sometimes it's a build from scratch. I make furniture and furnishings, jewellery and accessories and most of all I make a mess. Luckily for me, my family are all very tolerant of the chaos I seem to leave in my wake. The children are blasé about the fact that I turn up to the school gates shedding a drift of sawdust and wearing a streak of pink oil based gloss in my hair.

I meet lots of other mums who say that they can't do DIY or make things, but they could if they tried and if they had some help and encouragement, just as I'm managing to blog even after my first failed attempt. I'm hoping to share some of my projects and maybe even tutorials if I can get the hang of it.

You can do it. Have fun, make mistakes, scrap it and try again.